Installer un serveur Minidlna et le configurer pour démarrage au Boot (avec le démarrage de l’ordinateur)
Pour lire vos vidéos en Streaming sur votre téléviseur, vous souhaiterez installer un serveur Vidéo sur votre Ubuntu (ou autre distribution Linux, bien sur).
Rien de plus simple, commencez par installer Minidlna, rendez vous dans la Logithèque, tapez Minidlana dans la barre de recherche puis installez, c’est fait.
Configuration du Serveur
Comme tout serveur, Minidlna se configure par un fichier de configuration: /etc/minidlna.conf
Éditez ce fichier avec votre éditeur préféré: gedit pour moi, ouvrez un terminal et tapez:
sudo gedit /etc/minidlna.conf
Voici un contenu possible de ce fichier
# This is the configuration file for the MiniDLNA daemon, a DLNA/UPnP-AV media
# server.
#
# Unless otherwise noted, the commented out options show their default value.
#
# On Debian, you can also refer to the minidlna.conf(5) man page for
# documentation about this file.
# Path to the directory you want scanned for media files.
#
# This option can be specified more than once if you want multiple directories
# scanned.
#
# If you want to restrict a media_dir to a specific content type, you can
# prepend the directory name with a letter representing the type (A, P or V),
# followed by a comma, as so:
# * « A » for audio (eg. media_dir=A,/var/lib/minidlna/music)
# * « P » for pictures (eg. media_dir=P,/var/lib/minidlna/pictures)
# * « V » for video (eg. media_dir=V,/var/lib/minidlna/videos)
#
# WARNING: After changing this option, you need to rebuild the database. Either
# run minidlna with the ‘-R’ option, or delete the ‘files.db’ file
# from the db_dir directory (see below).
# On Debian, you can run, as root, ‘service minidlna force-reload’ instead.
media_dir=V,/home/utilisateur/Vidéos
# Path to the directory that should hold the database and album art cache.
#db_dir=/var/lib/minidlna
# Path to the directory that should hold the log file.
#log_dir=/var/log
# Minimum level of importance of messages to be logged.
# Must be one of « off », « fatal », « error », « warn », « info » or « debug ».
# « off » turns of logging entirely, « fatal » is the highest level of importance
# and « debug » the lowest.
#log_level=warn
# Use a different container as the root of the directory tree presented to
# clients. The possible values are:
# * « . » – standard container
# * « B » – « Browse Directory »
# * « M » – « Music »
# * « P » – « Pictures »
# * « V » – « Video »
# if you specify « B » and client device is audio-only then « Music/Folders » will be used as root
#root_container=.
# Network interface(s) to bind to (e.g. eth0), comma delimited.
network_interface=eth0
# IPv4 address to listen on (e.g. 192.0.2.1).
#listening_ip=
# Port number for HTTP traffic (descriptions, SOAP, media transfer).
port=8200
# URL presented to clients.
# The default is the IP address of the server on port 80.
#presentation_url=http://example.com:80
# Name that the DLNA server presents to clients.
friendly_name=mon serveur vidéo
# Serial number the server reports to clients.
serial=12345678
# Model name the server reports to clients.
#model_name=Windows Media Connect compatible (MiniDLNA)
# Model number the server reports to clients.
model_number=1
# Automatic discovery of new files in the media_dir directory.
inotify=yes
# List of file names to look for when searching for album art. Names should be
# delimited with a forward slash (« / »).
album_art_names=Cover.jpg/cover.jpg/AlbumArtSmall.jpg/albumartsmall.jpg/AlbumArt.jpg/albumart.jpg/Album.jpg/album.jpg/Folder.jpg/folder.jpg/Thumb.jpg/thumb.jpg
# Strictly adhere to DLNA standards.
# This allows server-side downscaling of very large JPEG images, which may
# decrease JPEG serving performance on (at least) Sony DLNA products.
#strict_dlna=no
# Support for streaming .jpg and .mp3 files to a TiVo supporting HMO.
#enable_tivo=no
# Notify interval, in seconds.
#notify_interval=895
# Path to the MiniSSDPd socket, for MiniSSDPd support.
#minissdpdsocket=/run/minissdpd.sock
Vous pouvez modifier en particulier les lignes en rouge. Ces lignes précisent:
media_dir=V,/home/utilisateur/Vidéos: le chemin vers votre dossier de vidéos (à changer selon votre configuration), le V signifiant que seules les vidéos du dossier seront scannées.
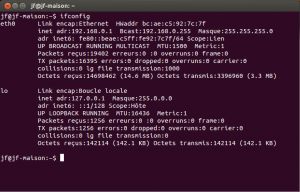
network_interface=eth0: ou vous spécifiez votre interface de réseau, généralement etho ou eth1 suivant votre carte réseau (la commande ifconfig vous donnera rapidement la réponse)
friendly_name=mon serveur vidéo pour donner un petit nom sympa à votre serveur
inotify=yes pour surveiller les nouveaux fichiers dans les dossiers…
Démarrage du serveur
Pour démarrer le serveur immédiatement vous pouvez utiliser la commande:
sudo service minidlna start
Lancer le serveur au Boot (démarrage de l’ordinateur)
Un bug affecte à priori le lancement du serveur au démarrage, voici une solution, un merci au site Lab notes
Il va falloir créer un fichier dans /etc/init/start-minidlna.conf
Clic droit sur le bureau, nouveau document vierge, copiez y ce contenu:
# Task to start Minidlna – lightweight DLNA/UPNP media server
# Minidlna is not starting correctly on boot, see bug
# https://bugs.launchpad.net/ubuntu/+source/minidlna/+bug/1053173
#
description « Task to start minidlna »
start on (local-filesystems and net-device-up IFACE!=lo)
task
exec service minidlna start
Ceci fait renommez ce fichier en start-minidlna.conf puis clic droit, propriétés, permissions, autoriser l’exécution comme programme.
Il ne reste plus qu’à déplacer ce fichier au bon endroit (/etc/init)
sudo mv l’endroit/ou/est/mon/fichier /etc/init
Redémarrez (reboot) votre ordinateur et votre serveur sera lancé.


